domingo, 24 de enero de 2016

Estuche de lino Zakka / Zakka Patchwork Pencil Case

Manel, mi pareja, lleva desde octubre estudiando inglés pero no fue hasta el otro día que no me di cuenta que llevaba el bolígrafo y el lápiz sueltos... y está claro que eso no podía ser (!!!)

Manel, my partner, is studying English language since last October but until last week I didn't realize he didn't have any pencil case ... and that should obviously be changed (!!!).


Así que le dije que le iba a hacer uno. Su cara fue muy divertida jeje fue una mezcla entre "por fin vas a hacer algo para mí" y "a ver qué me vas a hacer" :P 

So I told him I was going to make him one. He made a funny face hehe He seemed to be saying "you will finally do something for me" and "see what you're going to do" :P


Pero ya os puedo decir que le ha encantado y mañana ya lo va a estrenar!

But he has really loved it and tomorrow he will take it to his classroom.


El diseño es de Shannon Dréval (www.petitsdetails.com) y está incluido en el libro Zakka Style de Rashida Coleman-Hale. Por si no lo conocéis, es un libro totalmente recomendable que incluye 24 proyectos fantásticos de estilo zakka (que en japonés sería algo así como "muchas cosas"). 

The design is from Shannon Dréval (www.petitsdetails.com) and it's included in the book Zakka Style by Rashida Coleman-Hale. In case you don't know it, it's a totally recommended book with 24 zakka fantastic projects (zakka in Japanese is something like "many things").


Es de esos proyectos muy fáciles de seguir y que se hacen en un momento.

It's one of those really quick and easy to follow projects.


He combinado el lino con tres telas de diferentes estampados de una misma colección. Me gusta mucho cómo combinan ya que queda muy alegre y tanto hombres como mujeres pueden usarlo (o eso creo al menos...).

I've combined linen with three printed fabrics that belong to the same collection. I love how they mix as they look very lively and both men and women can use it (or at least I think so...). 


¿Qué os parece?  

What do you think?


Feliz semana!!
Have a nice week!! 

miércoles, 20 de enero de 2016

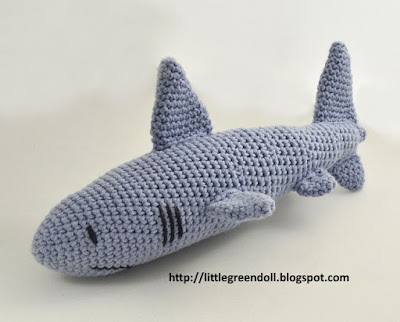
Tiburón Amigurumi / Amigurumi Shark

Si este verano venís a las playas de Barcelona ¡cuidado! han sido avistados un par de tiburones por sus costas... uno gris y el temible tiburón naranja! 

If you come in the Summer to Barcelona beaches, be carefull! two sharks have been spotted near the coast... a grey one and the fearful orange shark! 

Tiburón Amigurumi Shark

La fiebre por los tiburones empezó este verano pasado cuando llevamos a mis sobrinos a visitar el acuario de Barcelona, sobre todo por parte de Bruno, que quedó alucinado con ellos. Y claro, me pidió que le hiciera uno.

This passion for sharks began last Summer, when we took my nephews to visit Barcelona's Aquarium, especially on Bruno's side, who was absolutely stunned by them. Of course, he asked me to make him a shark.

Tiburón Amigurumi Shark

Así que estas Navidades les he regalado uno a cada uno. El gris azulado para Bruno y el naranja (por supuesto) para Simón. Les encantó! Y desde el primer día duermen con ellos jajaja 

So at Christmas I gave a shark to each one. The bluish grey was for Bruno and the orange one was (obviously) for Simon. They loved them! And right from the first day they even sleep with them hahaha

Tiburón Amigurumi Shark

Eso sí, muy temibles no me han salido porque les hice una sonrisa que les da un aire bonachón...

But they are not too scary as I sewed a kind smile on them...

Tiburón Amigurumi Shark

Por si queréis hacerlo, he seguido el patrón de Erika Olipiew que se puede descargar gratuitamente desde Ravelry (en inglés).

In case you wish to crochet one, I've followed Erika Olipiew 's pattern (free on Ravelry).

Tiburón Amigurumi Shark

Yo lo tengo claro, si alguna vez me tengo que encontrar un tiburón en el agua, que sea como estos ¿no os parece?

What is clear to me is that if I ever have to encounter a shark in the water, I want it to be a crocheted one, don't you think?

Tiburón Amigurumi Shark

Tiburón Amigurumi Shark

Tiburón Amigurumi Shark

Tiburón Amigurumi Shark

Feliz día!!
Have a nice day!!

jueves, 14 de enero de 2016

Tutorial Adorno Navidad 2015/ DIY Christmas Ornament 2015

Lo prometido es deuda, y aunque ya han pasado las Navidades, os pongo el tutorial del adorno del erizo por si queréis hacerlo para las próximas Navidades. Podéis descargaros el patrón AQUÍ

A promise is a promise, and although Christmas is over, I have prepared the tutorial of the Hedgehog Christmas Ornament in case you'd like to do it for next Christmas. You can download the pattern HERE.

DIY Christmas Ornament Hedgehog

El material que he utilizado este año ha sido el fieltro y una cinta para colgarlo.

This year I have used felt and a ribbon to hang it.

Paso a paso / Instructions:

1. Calcar el patrón y cortar todas las piezas. Las piezas del cuerpo ya llevan el margen para luego poderlas cortar con la tijera dentada.
Trace the pattern and cut all the parts. The seam allowance is already included in the body parts.

DIY Christmas Ornament Hedgehog

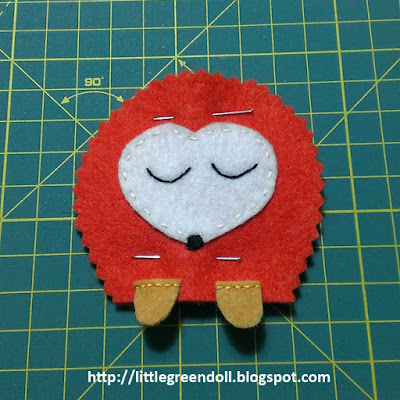
2. Coser el fieltro blanco (cara) a una de las piezas del cuerpo.
Sew the white felt (face) to one of the parts of the body.


DIY Christmas Ornament Hedgehog

3. Bordar los ojos y la nariz.
Embroider the eyes and the nose.

DIY Christmas Ornament Hedgehog

4. Coser las patitas al cuerpo. 
Sew the legs to the body. 

DIY Christmas Ornament Hedgehog

5. Unir las dos piezas del cuerpo y fijarlas con alfileres. Recortar el borde con las tijeras dentadas (la parte de abajo del cuerpo no hace falta).
Put the two parts of the body together and fix them. Cut the edges with zig zag scissors (you don't need to cut the bottom of the body).

 DIY Christmas Ornament Hedgehog

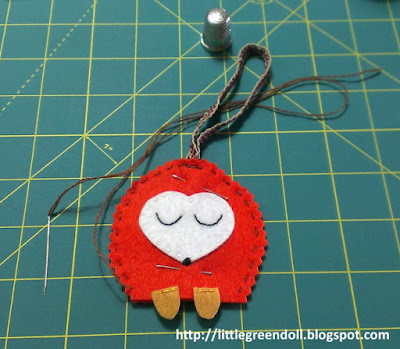
6. Colocar la cinta entre las dos partes del cuerpo y coser alrededor del borde dejando la parte inferior sin coser para poder rellenar el adorno.
Place the ribbon between the two parts of the body and sew along the edge. Don't sew the bottow of the body yet in order to fill in the ornament with the stuffing.

DIY Christmas Ornament Hedgehog

7. Poner el relleno al cuerpo y acabar de coser la parte inferior del cuerpo.
Fill in the body with the stuffing and sew the bottom of the body.

DIY Christmas Ornament Hedgehog

Y ya está! Es súper fácil y muy rápido de hacer. Si lo probáis, ya lo veréis.

And that's it! It's incredibly easy and quick to do. You'll see it if you do it.

DIY Christmas Ornament Hedgehog

Espero que os guste y que os animéis a hacerlo. Enviadme alguna foto, que me hará mucha ilusión ver los vuestros.


I hope you like it and you decide to do it. Please, send me some photos if you do it. I'd love to see yours! 


DIY Christmas Ornament Hedgehog

DIY Christmas Ornament Hedgehog

Feliz jueves!!
Have a nice day!!

miércoles, 6 de enero de 2016

Adorno Navidad 2015 / 2015 Christmas Ornament

Hoy día de Reyes y último día de celebraciones, me despido de las Navidades con el adorno que he hecho este año para regalar a mi familia. Mañana ya vuelta a la rutina...

Today is the Three Wise Men Day and the last Christmas celebration in Spain, so I say goodbye to Christmas with the ornament I've made this year for my family. Tomorrow I get back to the routine ...


Ya le quedan pocos días al árbol... este fin de semana guardaré todos las decoraciones navideñas y hasta el año que viene.

Next weekend I'll put all the Christmas decorations away until next year.


Estoy preparando el tutorial de este erizo por si queréis hacerlo el próximo año.

I'm preparing a tutorial of this hedgehog ornament in case you want to do it next year.


Con este adorno participo en el Reto de Navidad que nos propuso Xandra del blog Arte Friki

With this ornament I take part in the Christmas Party organized by Xandra (Arte Friki blog).


Feliz día de Reyes para tod@s!

Have a great Three Wise Men day!

sábado, 2 de enero de 2016

Feliz 2016! / Happy 2016!

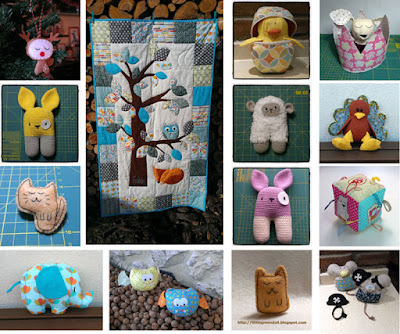
Con esta recopilación de los proyectos que he realizado este 2015, os deseo un fantástico año lleno de ilusión y creatividad! 

With this review of the projects I've made on 2015, I wish you a wonderful and creative new year!

LittleGreenDoll 2015

Entre mis objetivos de este año me he propuesto hacer más proyectos (ya no hablo de los UFOs...) y arreglar el blog, que ya llevo mucho tiempo con la misma plantilla.

Muchas gracias por acompañarme y por inspirarme con vuestros trabajos!

Some of my objectives for this new year is to make more projects (and I don't speak about UFOs...) and to change my blog template, as it's a long time now that I have the same one.

Thanks a lot for joining me and for inspiring me with your works!

Feliz 2016!!     Happy 2016!!

Quizás también te interese:

Related Posts Plugin for WordPress, Blogger...